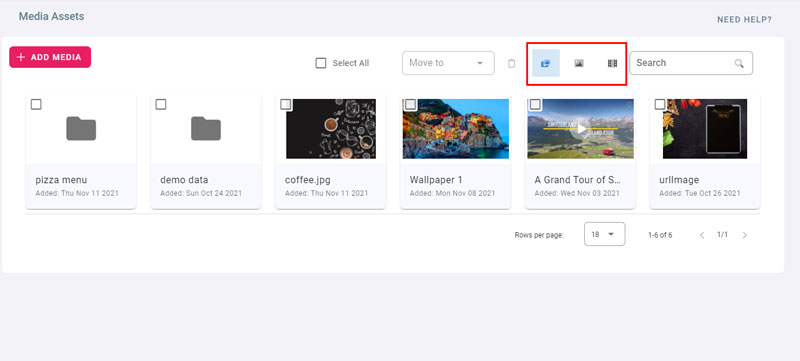
Media Assets is a media library of videos, images and PDFs.
- It supports most videos and images formats, in addtion to PDF files.
- Files uploaded and imported to playlists can be managed from Media Assets.
- Also, if you haven’t created playlists yet, files can be uploaded from media assets and reused in multiples playlists without having to upload them again.
- Media Assets helps organise media by folders. It also allows to search through media by name and type.
Important Note:
Files deleted from the media assets will be deleted from all the playlists they are used in.
Upload Media
- Click on Add Media
- Click on Upload Media Assets
- You can upload from your device, Dropbox, OneDrive, and Facebook
- Select your files and wait for the upload to complete
- Click on Done
Media Assets Settings
- Hover the media item and click on the settings icon on the top right corner
- You can rename the media assets, delete them, enable proof of play and add tags
- Click on Save to save the new settings
Create Folders
- Click on Add Media
- Click on Add Folder
- Type in the folder name
- Click on Add
- Subfolders can be created inside other folders
- To rename a folder or delete it, click on the settings icon on the top right corner of the folder
Move media assets to folders
- Click on the check box on the top left of the media asset to select it
- Select one or multiple assets
- Click on Move to drop down and click on the destination folder
- Your assets will be moved to the destination folder
- Click on a folder to view its content
- To directly Add media assets inside folders, Click on Add, then Add media Assets
- To create sub folders, click on Add, then Add Folder while you are inside the folder
- To navigate through folders or return to top level, use the navigation bar
Filter

- Use the buttons marked in red to respectively Show All, Show Images Only, Show Videos Only
Search
- Type in a search text to filter the media assets and folders by name
To use media assets in a playlist, refer to Media Assets App